USB cables can be a huge headache. They're deceptively simple, with huge amounts of variation underneath the same broad categories — and that's not even touching on cables that are labeled incorrectly.
We're going to look at some of the top USB cable blunders that test engineers make: mistakes can seriously undermine your test results and render the data you get back useless. Of course, we'll also look at how to avoid these common pitfalls and share some technological advancements that can safeguard against human error and poorly labeled cables in your testing process.

Mistake #1: Not testing your cables before installation
Not all cables are created equally. As if testing engineers didn't already know this basic truth, Lumafield's recent release of their X-ray scans of USB-C cables dramatically illustrated that point, uncovering the vast differences in quality between different USB cables.
Therefore, test engineers will want to be sure they have the best cables for their application before use.
A USB cable tester is an invaluable tool in any engineer's kit. Especially with the proliferation of cheaply made cables that aren't always labeled correctly, it's key that you know exactly what your cable is capable of before you begin applying it in a testing environment.
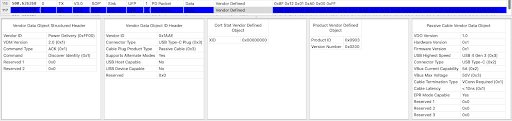
You can test and analyze cables with Acroname's USBHub3c, which has an eMark reader feature. It will give you information about how the cable self-identifies including maximum voltage, maximum current, maximum USB protocol, and cable type (passive vs. active).
The PD Logging feature will also give you more information about the cable, including the VID (vendor ID) and PID (product ID). Here’s an example of the information that comes back when a cable is identified via the PD Logger:
Pro tip: Be sure to break out the label maker before you throw the cable you’ve just tested back into the bin of unlabeled cables.
(Note that eMark chips can be wrong, especially on cheap cables made in environments with little concern for quality. You'll want to test the stated claims against the actual performance of the cable. To avoid this concern, be sure to source your cables from a company that knows exactly how they’re constructed. For instance, we have all of the details on the full construction of our Acroname cables to ensure you get the performance we promise.)
Technical testing will need to look for supported protocols (such as DisplayPort, Thunderbolt, and USB) and USB bandwidth, as well as power delivery specifications.
Mistake #2: Not doing flip testing (if needed).
One of the advantages of USB-C is those orientation-agnostic connectors, which allow users to plug them in either way. Unlike previous generations of USB technology, there’s no trying to plug the device in wrong and flipping the cable over.
However, even though the plug can be inserted either way, there still is a difference between the two directions. This means your device will be plugged in with that USB-C plug flipped both ways, and you must test its performance in both of those orientations. (You can read more on this topic in our article on Why USB-C Connections Sometimes Don’t Work.)
That’s why flip testing is an important part of the test process for any device. In addition to performance, you'll also want to double-check safety when the cable is flipped.
We highly recommend the Acroname USBHub3c for this application. It comes with a Cable Flip feature, which allows users to test USB-C cables in both orientations without unplugging the cable by enabling only one of the Configuration Channels (CC lines) in the connector at a time in conjunction with Acroname’s Universal Orientation Cables. You can automate the entire process of flip-testing USB cables without having to manually unplug, re-plug, and re-test the cables.
If you've ever needed to do flip testing that involved unplugging and plugging cables back in, you know exactly why this feature is 100% worth it.
Mistake #3: Not checking how many pins the connection has.
Do you have all the pins you need for your application?
The USB-C standard includes charging, data transfer, audio, visual, and other capabilities. But just because a cable is a USB-C cable doesn't mean it can do all of those things. Some cables are dedicated for charging, have data-transfer abilities but lack fast-charging, are not rated for different Alt-Modes such as Thunderbolt, and so on.
Each USB-C cable has 24 pins on each connector, but between 7 to 16 different signals in the wire, depending on its capabilities.
Counting the pins is only effective up to a point. Many wires have the full pin count, but don’t have the corresponding full wire count; these will look like they are compatible with USB3 data but wouldn’t actually have the capability.
Some cheaply made cables won’t have all the pins, may be marked wrong, and can even have the wrong eMark chip. Do your due diligence and be sure you have all the physical pins present that represent the connections you need for testing. This is where a device to check your cables becomes invaluable.
Buying high-quality cables from a reputable source can help head off many of these problems from the outset. Trying to save money by buying the least-expensive cables an internet search can offer may end up costing you much more in wasted time and frustration. Your cables are your tools: you need to be able to trust them.
Mistake #4: Working in the wrong USB format.
What cables do you need for your testing application? Double-check that you're working in the correct version of USB that you need. USBHub3C will identify USB2 and USB3 cables.
For USB-A, there is a simple way tell the difference between USB 2.0 and USB 3.0 cables at a glance:
- USB-A plugs on USB 3.0 cables are blue where the pins are set
- USB-A plugs on USB 2.0 cables are black where the pins are set
However, there is no visual difference between USB2 and USB3 for USB-C cables. In order to identify which type of cable you have, you must access the eMark information.
To distinguish between versions such as 3.0, 3.1, and 3.2, running a simple cable test is the fastest, most reliable way to double-check that you're using the right version.
Our blog post on types of USB-C cables is a great resource for diving into all of the differences within the USB-C standard as well. Check it out for more details.
Mistake #5: Failing to do backward compatibility testing.
Ideally, consumers would be using all of the right cables, chargers, and the latest, most compatible devices. But we don't live in that world, so backward compatibility testing is key to ensuring both safety and customer satisfaction.
You'll want to have a good understanding of your product's performance when using older cables, less advanced USB technology, and slower data transfer speeds.
You can automate this process with USBHub3c, which can emulate a less-than full-featured cable by forcing a USB2 or USB3 connection. Simply change the settings via the software API, then repeat the test with the new settings.
Mistake #6: Over-relying on adapters to resolve compatibility issues.
Do you have adapters in your system? Adapters can be cables, or they can actually show in the USB tree as devices. For instance, a USB-C to A adapter is a cable, while a USB-C to HDMI adapter is a device. Likewise, USB Active cables are classified as cables, whereas USB extenders count as devices.
Not all adapter usage is a problem. USB adapters can be handy devices that allow you to use USB technology, equipment, and tools that you might otherwise not be able to access.
However, in a testing environment, adapters can muddy the waters. They might decrease signal quality or cause other issues. (If you’ve ever run into a situation with USB-C to A adapters that only support USB 2, rather than USB 3, you know how this can cause problems.) If you're running into issues with your USB device testing setup, the fault may lie with adapters.
In conclusion, it’s best to avoid adapters altogether if you can. If that’s not possible, ensure they are up to spec and not introducing issues into your test environment.
Mistake #7: Overextending cable length.
The more you extend your cables, the more you’ll begin to lose functionality. Recommended cable lengths are as follows:
- USB 1.0: about 3m
- USB 2: 5m
- USB 3.2 (5Gbps, 10Gbps, 20Gbps): 3m
- USB 4 (20Gbps, 40Gbps): 0.8m
USB 3.0 cables can be extended further for certain purposes, but the longer you go, the more interference you’ll run into with features such as USB2 and USB 3 data transfer. The cables may continue to work for simple use cases, but run into problems with more complex uses.
In general, in a testing environment, cable length should be as short as possible.
If that’s not possible, options include:
- Active extension cables. These enhance the USB signal to help preserve functionality for up to 98 feet, or 30 meters, for USB 3.0 and up cables. They do require a power source, so you will have to factor that into your lab setup.
- USB hubs. Powered USB hubs allow the USB signal and power delivery to re-transmit, helping preserve full functionality.
In general, a simple setup is preferable. When you open up your USB tree, what does it look like? If it's overly complex, with too many pieces in the tree or too much length, you may be introducing opportunities for error that can influence your testing data.
Our article on the maximum number of devices you can have in a USB tree breaks down how the number of devices and the number of hops both work to affect how the final setup performs.
If you're having problems, try an Active cable that uses either a linear redriver or a retimer to maintain the signal integrity. Simplifying the setup and tightening everything up will minimize the opportunities for interference.

Conclusion: High-quality cables = high-quality test results.
As the saying goes, "garbage in, garbage out." Your test results are only as good as your testing methods. Avoiding these seven common USB cable blunders goes a long way toward getting high-quality data that your entire team can rely on.
Careful checking and re-checking can help test engineers avoid many of these mistakes, but high-quality tools are also essential for running high numbers of tests efficiently. Tools that can automatically test and verify the different stages of your testing process are invaluable in ensuring your test results are as accurate as possible.
High-quality, certified cables such as Acroname’s USB-C USB4 coax cable and other cable offerings also help ensure that your setup runs as expected with specifications you can trust.
Add new comment